01: Command Line + Python
Class Structure
Section titled “Class Structure”- Lectures cover new material
- Assignments after each lecture (caveats apply)
- Lab for hands-on help completing the practical assignment
- Assignments are always due the following week unless otherwise noted
- Two exams (or just one for 1-unit course)
Getting Started: Your First Steps
Section titled “Getting Started: Your First Steps”Before we dive into the technical content, let’s make sure you have everything you need to succeed. This section covers the essential setup that every data scientist needs.
Getting to the Command Line
Section titled “Getting to the Command Line”
The command line is your direct conversation with your computer. Here’s how to access it on different systems:
Windows Users: WSL:
- Windows Subsystem for Linux (WSL) (recommended): Run
wsl --installin PowerShell as Administrator
Native:
- PowerShell (built-in): Press
Win + X, then select “Windows PowerShell” - GitHub Codespaces (cloud option): No installation needed
Mac Users:
- Terminal (built-in): Press
Cmd + Space, type “Terminal”, press Enter - GitHub Codespaces (cloud option): No installation needed
Cloud Options:
- GitHub Codespaces: Free tier available, works on any device with internet
Installing Python
Section titled “Installing Python”Python is the language of data science. Here’s how to get it on your system:
Windows WSL (Ubuntu):
sudo apt updatesudo apt install python3 python3-pip python3-venvWindows Native:
# Option 1: Official installer from python.org# Download Python 3.12+ from <https://python.org>
# Option 2: Using winget (Windows Package Manager)winget install -e --id Python.Python.3.12
Mac:
# Option 1: Using Homebrew (recommended)# First install Homebrew from <https://brew.sh>brew install python3
# Option 2: Official installer from python.org# Download Python 3.12+ from <https://python.org>
Verify Installation:
python3 --version# Should show: Python 3.12.x (or similar)Text Editor Options
Section titled “Text Editor Options”You’ll need a good text editor to write Python code. Here are your options:
Visual Studio Code (Recommended):
- Free, powerful, and perfect for data science
- Available on all platforms
- Built-in Python support
- Can open files from command line with
code filename.py
Other Options:
- Sublime Text: Fast and lightweight
- PyCharm: Full-featured Python IDE
- nano: Simple command-line editor for quick fixes
Why VS Code?
Section titled “Why VS Code?”
VS Code strikes the perfect balance between simplicity and power. It’s what most professional data scientists use, and it’s what we’ll use in this course.
Starting with GitHub
Section titled “Starting with GitHub”Creating Your GitHub Account
Section titled “Creating Your GitHub Account”Reference:
- Go to github.com
- Sign up with your UCSF email (or personal email)
- Use your actual UCSF email so I can find you, or not
- You can always add/remove email addresses later
- Choose a professional username (you’ll use this for years!)
- Verify your email address
Username Tips:
- Use your name or initials:
alice-smith,asmith-the-best-one-ever - Avoid hard-to-remember numbers:
alice_smith_9847 - Keep it professional? - future employers will see this
- You can change it later, but links might break
GitHub Student Pack (Optional Bonus) With your .edu email, you can get free premium features. We don’t need them for class, but they’re nice to have!
Setting Up Git in VS Code
Section titled “Setting Up Git in VS Code”- Install VS Code (if not already done)
- Open VS Code → View → Source Control (or Ctrl+Shift+G)
- If first time: VS Code will prompt to configure Git username/email
Git configuration (one-time setup):
- Full Name: Christopher Seaman
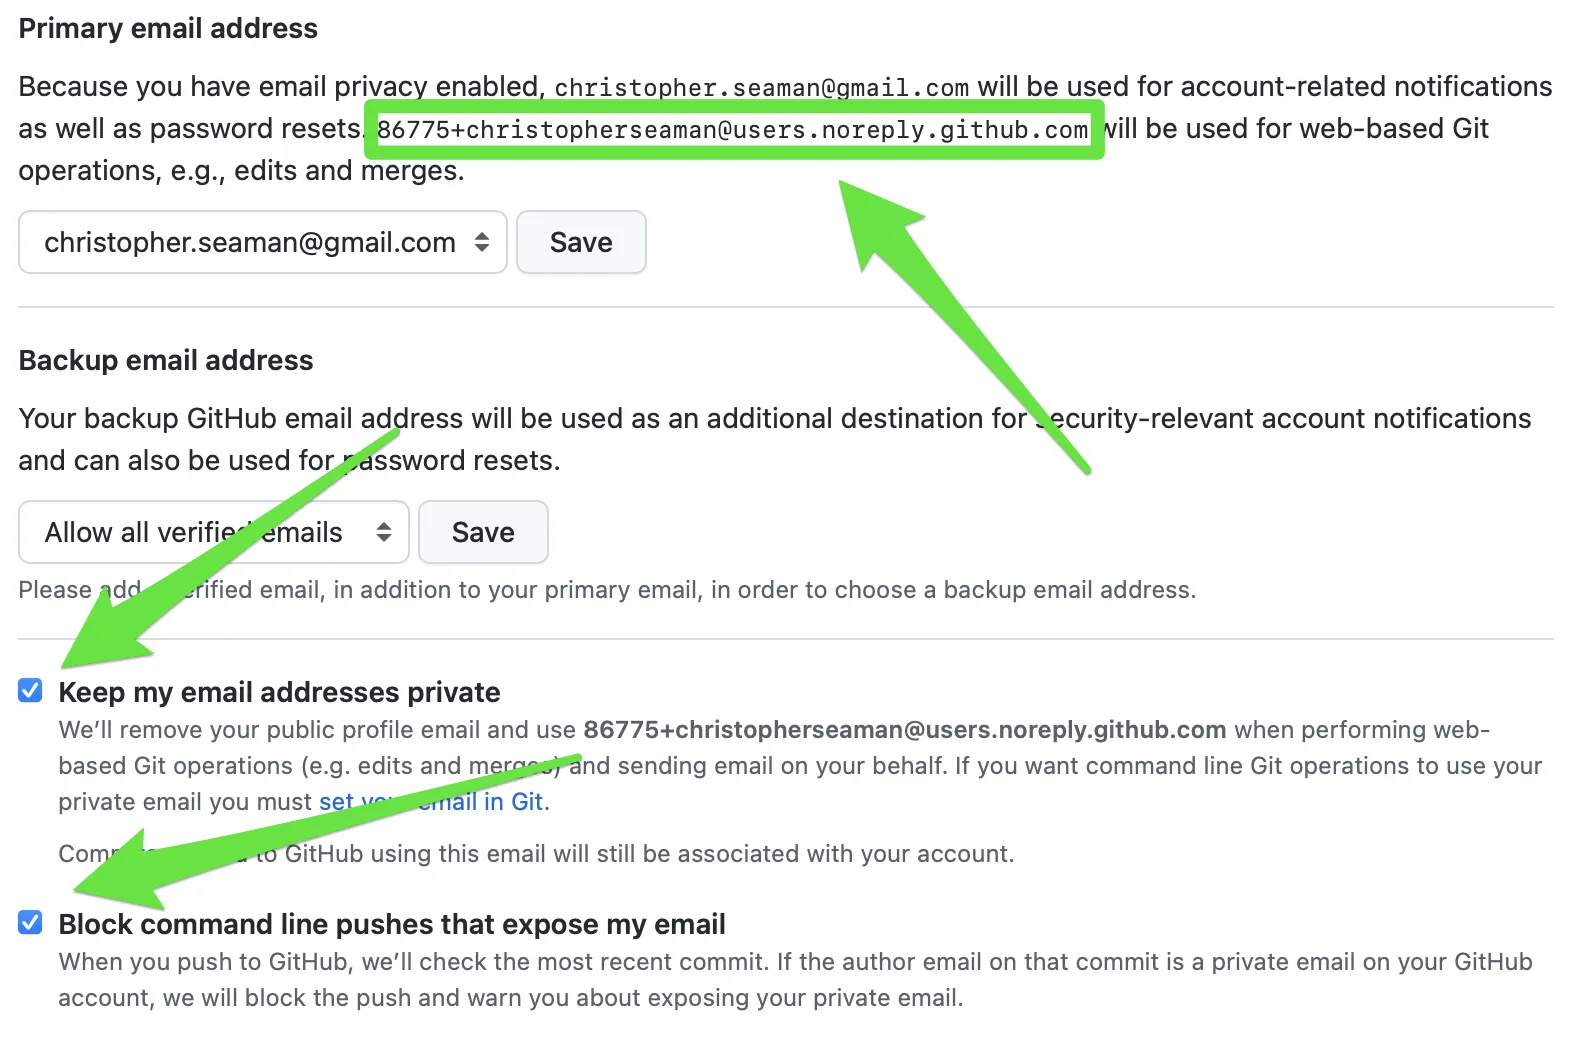
- Email: 86775+christopherseaman@users.noreply.github.com
DON’T USE YOUR REAL EMAIL IN GIT CONFIG
Section titled “DON’T USE YOUR REAL EMAIL IN GIT CONFIG”You don’t want to put your email all over the public internet, so GitHub provides a proxy service. You can see the proxy email address in your GitHub email settings https://github.com/settings/emails.
Setting up Git in the Command Line
Section titled “Setting up Git in the Command Line”(Shouldn’t be necessary if already done through VS Code)
git config --global user.name "<YOUR NAME>"git config --global user.email "<YOUR GITHUB PROXY EMAIL>"LIVE DEMO!
Section titled “LIVE DEMO!”Setting up
Why Both Python and Command Line?
Section titled “Why Both Python and Command Line?”You might wonder: “Why do I need to learn two things at once?” Here’s the reality - professional data scientists constantly switch between Python scripts and command line operations. You’ll write Python to analyze data, then use command line to organize files, run scripts, and manage projects.
It’s like being bilingual in the data world. Python speaks to your data, command line speaks to your computer.
Command Line Essentials
Section titled “Command Line Essentials”What is the Command Line?
Section titled “What is the Command Line?”The command line is your direct conversation with your computer. Instead of clicking icons, you type commands. Why? Because it’s faster, more precise, and works exactly the same way on every computer.
Think of it as texting your computer instead of playing charades with icons.

Navigation Commands
Section titled “Navigation Commands”Reference:
pwd- Print working directory (where am I?)ls- List contents (what’s here?)ls -la- List with details (show me everything)cd [path]- Change directory (go somewhere)cd ..- Go up one levelcd ~- Go to home directory
Brief Example:
pwd # Shows: /Users/yournamels # Shows files in current directorycd Documents # Move to Documents folderpwd # Shows: /Users/yourname/DocumentsFile and Directory Operations
Section titled “File and Directory Operations”Reference:
mkdir [name]- Make directorymkdir -p [path/to/nested]- Make nested directoriestouch [filename]- Create empty filecp [source] [destination]- Copy filemv [source] [destination]- Move/rename filerm [filename]- Remove file (careful!)rm -r [directory]- Remove directory and contents (very careful!)
Extended Examples for Data Science Workflows:
# Create a typical data science project structuremkdir data-science-projectcd data-science-projectmkdir data scripts results docs
# Create placeholder files for our projecttouch data/raw_data.csvtouch scripts/analysis.pytouch docs/project_notes.md
# View our project structurels -la# You'll see: data/ scripts/ results/ docs/ and our files
# Copy important files to backup locationcp data/raw_data.csv data/raw_data_backup.csv
# Rename a file to be more descriptivemv scripts/analysis.py scripts/customer_analysis.py
Common File Operation Patterns:
# Pattern 1: Organizing downloaded data filesmkdir -p project/data/{raw,processed,cleaned}mv ~/Downloads/*.csv project/data/raw/
# Pattern 2: Creating dated backup directoriesmkdir backups/$(date +%Y-%m-%d)cp -r project/ backups/$(date +%Y-%m-%d)/
# Pattern 3: Finding and organizing files by typemkdir analysis/{python,jupyter,results}find . -name "*.py" -exec cp {} analysis/python/ \\;
Brief Example:
mkdir my_data_project # Create project foldercd my_data_project # Enter the foldertouch analysis.py # Create Python filemkdir data # Create data subfolderViewing Files
Section titled “Viewing Files”Reference:
cat [filename]- Show entire file contentshead [filename]- Show first 10 lineshead -n 5 [filename]- Show first 5 linestail [filename]- Show last 10 linestail -n 20 [filename]- Show last 20 lines
Brief Example:
head data.csv # Quick peek at data filetail -n 5 results.txt # See the last few resultsGetting Help
Section titled “Getting Help”Reference:
man [command]- Manual page for command[command] --help- Quick help for commandwhich [command]- Find where command is located- Books! (see the syllabus)
- Your favorite LLM
- A buddy?
- Course EA’s and myself
Make it Stop!
Section titled “Make it Stop!”Sometimes you need to stop what you’re doing:
Command Line:
Control-c- Cancel the current commandexit- Close the terminal
Python:
Control-c- Cancel the current operationexit()- Quit interactive Python
LIVE DEMO!
Section titled “LIVE DEMO!”Command line tools
Python Basics
Section titled “Python Basics”
Running Python
Section titled “Running Python”You have three ways to run Python:
- Interactive mode (REPL): Just type
pythonand start experimenting - Script mode: Write code in a file, run with
python filename.py - Jupyter notebooks: We’ll meet these later!
Reference:
python # Start interactive Pythonpython script.py # Run a Python scriptexit() # Quit interactive PythonInteractive Mode Example:
$ python>>> print("Hello, World!")Hello, World!>>> exit()Script Mode Example:
$ python my_script.pyPython Syntax Overview
Section titled “Python Syntax Overview”Python has some unique syntax rules that are essential to understand:
Indentation Matters! Python uses indentation (spaces or tabs) to group code together. This is different from most programming languages:
# Correct indentationif x > 0:    print("Positive")    # This line is indented    print("Still positive")  # This line is also indented
# Wrong indentation (will cause an error)if x > 0:print("This will cause an IndentationError")
Comments Use #
# This is a comment - Python ignores this lineprint("This is code") # Comments can also go at the end of linesKey Syntax Rules:
- Use 4 spaces for indentation (not tabs)
- No semicolons needed at the end of lines (but you can have them if you REALLY want them)
- Case-sensitive:
Nameandnameare different variables - Use quotes for strings:
"Hello"or'Hello'
Variables and Data Types
Section titled “Variables and Data Types”Python stores information in variables - think of them as labeled boxes that you can put different types of information in.
Numbers - The Foundation of Data Science
Section titled “Numbers - The Foundation of Data Science”# Integers (whole numbers)student_count = 150year = 2024temperature_celsius = -5
# Floats (decimal numbers)average_grade = 87.3height_meters = 1.75pi_approximation = 3.14159
# Scientific notation for very large/small numberspopulation = 1.4e9 # 1.4 billionatom_mass = 1.67e-27 # Very small numberText - Essential for Data Labels and Categories
Section titled “Text - Essential for Data Labels and Categories”# Strings for text datastudent_name = "Alice Johnson"department = "Data Science"file_path = "/Users/alice/projects/analysis.py"
# String methods you'll use constantlyname_upper = student_name.upper() # "ALICE JOHNSON"name_lower = student_name.lower() # "alice johnson"name_title = student_name.title() # "Alice Johnson"clean_name = " Bob Smith ".strip() # Removes whitespace: "Bob Smith"Boolean - Essential for Data Filtering
Section titled “Boolean - Essential for Data Filtering”# True/False values for logical operationshas_complete_data = Truemissing_values = Falseanalysis_ready = True and has_complete_data # Trueneeds_cleaning = missing_values or not analysis_ready # FalseVariable Naming Best Practices:
# Good variable names (descriptive and clear)student_age = 22average_test_score = 85.7data_file_path = "student_grades.csv"
# Avoid these (unclear or confusing)a = 22                  # What does 'a' represent?x1 = 85.7              # Meaningless variable nametemp = "grades.csv"     # 'temp' usually means temporary
Understanding Variable Types (Debugging Foundation):
# Check what type a variable is (essential for debugging!)student_name = "Alice"student_age = 22grade_average = 87.5
print(type(student_name))    # <class 'str'>print(type(student_age))     # <class 'int'>print(type(grade_average))   # <class 'float'>
# This is crucial when data doesn't behave as expected!mysterious_data = "22"       # Looks like a number, but it's textprint(type(mysterious_data)) # <class 'str'> - Aha! That's the problem
Basic Operations
Section titled “Basic Operations”Reference:
# Math operationsresult = 10 + 5         # Addition: 15result = 10 - 3         # Subtraction: 7result = 4 * 6          # Multiplication: 24result = 15 / 4         # Division: 3.75result = 15 // 4        # Integer division: 3result = 15 % 4         # Remainder: 3result = 2 ** 3         # Power: 8
# String operationsfull_name = first + " " + last        # Concatenationmessage = f"Hello {name}!"            # f-string formatting (preferred)
Brief Example:
# Calculate BMIweight_kg = 70height_m = 1.75bmi = weight_kg / (height_m ** 2)print(f"BMI is {bmi:.1f}")
Control Structures
Section titled “Control Structures”Control structures let your programs make decisions and repeat actions - essential for data analysis!
Comparison Operators
Section titled “Comparison Operators”Reference:
# Equality and inequalityx == y          # Equal tox != y          # Not equal tox < y           # Less thanx > y           # Greater thanx <= y          # Less than or equalx >= y          # Greater than or equal
# Membership testingx in [1, 2, 3]  # Is x in the list?x not in [1, 2, 3]  # Is x NOT in the list?
If Statements
Section titled “If Statements”Basic If Statements:
# Simple decision makingscore = 85
if score >= 90:    print("Grade: A")elif score >= 80:    print("Grade: B")elif score >= 70:    print("Grade: C")else:    print("Grade: F")
Compound Conditions:
# Multiple conditions with and/orage = 25has_license = True
if age >= 18 and has_license:    print("Can drive")elif age >= 16 and not has_license:    print("Can learn to drive")else:    print("Cannot drive")
For Loops
Section titled “For Loops”Basic For Loops:
# Count from 0 to 4for i in range(5):    print(f"Count: {i}")
# Loop through a listgrades = [85, 92, 78, 96, 88]for grade in grades:    print(f"Grade: {grade}")
Practical Data Science Example:
# Calculate average gradegrades = [85, 92, 78, 96, 88]total = 0count = 0
for grade in grades:    total += grade    count += 1
average = total / countprint(f"Average grade: {average:.1f}")
Printing and Basic Input
Section titled “Printing and Basic Input”Essential Output Formatting for Data Science:
# Basic printing - your daily communication toolprint("Hello world")                    # Basic printingprint("Value:", 42)                     # Multiple valuesprint("Processing complete!")           # Status updates
# F-string formatting - the data scientist's best friendstudent_name = "Alice"test_score = 87.3class_average = 82.1
print(f"Student: {student_name}")                    # Basic variable insertionprint(f"Score: {test_score}")                        # Number displayprint(f"Score: {test_score:.1f}")                    # One decimal place: 87.3print(f"Score: {test_score:.0f}%")                   # No decimals: 87%print(f"Above average by {test_score - class_average:.1f} points")  # Calculations inside f-strings
Advanced F-String Patterns for Data Analysis:
# Currency formatting (useful for business data)revenue = 15432.50print(f"Revenue: ${revenue:,.2f}")                   # $15,432.50
# Percentage formattingsuccess_rate = 0.847print(f"Success rate: {success_rate:.1%}")           # 84.7%
# Scientific notation for very large/small numberspopulation = 1400000000print(f"Population: {population:.2e}")               # 1.40e+09
# Padding and alignment for clean output tablesprint(f"{'Name':<15} {'Score':>8} {'Grade':>8}")    # Column headersprint(f"{'Alice':<15} {87.3:>8.1f} {'B+':>8}")      # Left/right aligned dataprint(f"{'Bob':<15} {92.1:>8.1f} {'A-':>8}")
# Date formatting (preview for later lectures)from datetime import datetimetoday = datetime.now()print(f"Analysis run on: {today:%Y-%m-%d %H:%M}")    # 2024-01-15 14:30
Basic Input (Rare in Data Science, but Good to Know):
# Interactive input - mainly for testing and debuggingname = input("Enter your name: ")                    # Gets text from userage_str = input("Enter your age: ")                  # Always returns string!age = int(age_str)                                   # Convert to numberprint(f"Hello {name}, you are {age} years old")
# Be careful: input() always returns stringsuser_number = input("Enter a number: ")              # This is text: "42"print(type(user_number))                             # <class 'str'>actual_number = float(user_number)                   # Convert to number: 42.0print(type(actual_number))                           # <class 'float'>
Why F-Strings Matter in Data Science: F-strings let you create clear, readable output that tells the story of your data. Instead of printing raw numbers, you can provide context, explanations, and professional formatting that makes your analysis understandable to anyone.
Debugging and Error Handling Basics
Section titled “Debugging and Error Handling Basics”
Reading Python Error Messages (Essential Skill!):
When Python encounters a problem, it tells you exactly what went wrong. Learning to read these messages will save you hours of frustration.
# Common error: trying to use an undefined variableprint(student_naem) # Typo in variable nameNameError: name 'student_naem' is not definedHow to Read This Error:
- Error Type:
NameError- Python doesn’t recognize the variable name - Error Message: tells you exactly what’s wrong
- Your Action: Check spelling, make sure you defined the variable first
More Common Errors You’ll Encounter:
# Type errors - mixing incompatible data typesage = "25" # This is text, not a numbernext_year = age + 1 # Can't add number to textTypeError: can only concatenate str (not "int") to strHow to Fix It:
age = "25" # Textage_number = int(age) # Convert to numbernext_year = age_number + 1 # Now this works!print(f"Next year you'll be {next_year}")Value Errors - Wrong Type of Value:
bad_number = int("hello") # Can't convert "hello" to a numberValueError: invalid literal for int() with base 10: 'hello'Debugging Strategy for Beginners:
- Read the error message carefully - Python is usually very specific
- Check variable names for typos - most common beginner mistake
- Use
print()to check variable values and types - Check your data types with
type(variable_name)
Defensive Programming Example:
# Always check what type your data is when debugginguser_input = "42"print(f"Input: {user_input}")print(f"Type: {type(user_input)}")       # Shows: <class 'str'>
# Convert and verifynumber = int(user_input)print(f"Converted: {number}")print(f"New type: {type(number)}")       # Shows: <class 'int'>
# Now you can safely do mathresult = number * 2print(f"Result: {result}")
Error Prevention Tips:
- Use descriptive variable names - reduces typos
- Check types when debugging - use
type()function - Test with small examples first - don’t write 50 lines then run
- One step at a time - add complexity gradually
LIVE DEMO!
Section titled “LIVE DEMO!”Python basics and debugging
Simple Workflow Example
Section titled “Simple Workflow Example”Basic Data Calculation Workflow:
# Command line: Set up workspacemkdir data_analysiscd data_analysistouch calculate_stats.py# Simple statistical analysissales_data = [1200, 1500, 1800, 1100, 1650, 1750]total_sales = sum(sales_data)average_sales = total_sales / len(sales_data)best_day = max(sales_data)
print(f"Weekly Sales Analysis")print(f"Total sales: ${total_sales:,}")print(f"Average daily sales: ${average_sales:.2f}")print(f"Best day: ${best_day}")# Command line: Run the analysispython calculate_stats.pyOutput:
Weekly Sales AnalysisTotal sales: $9,000Average daily sales: $1,500.00Best day: $1750Key Workflow Principles:
- Start small - test logic with simple data first
- Build incrementally - add complexity step by step
- Test frequently - run your code after every few changes
- Save your work - use meaningful file names and organize results
- Document as you go - use print statements to explain what’s happening
Key Takeaways
Section titled “Key Takeaways”By the end of today’s session, you should feel comfortable with:
- Command line navigation = Your direct conversation with the computer
- Navigate directories with
cd,pwd,ls - Create project structures with
mkdir,touch - View files with
head,tail,cat
- Navigate directories with
- Python fundamentals = The foundation of data analysis
- Variables store different types of data (numbers, text, booleans)
- F-strings create professional, readable output
- Error messages are your friends - they tell you exactly what’s wrong
- Integration workflow = The data scientist’s daily routine
- Use command line to organize files and run scripts
- Use Python to process data and generate insights
- Test small, build incrementally, save your work
- Debugging mindset = Essential problem-solving skills
- Read error messages carefully
- Check variable types when things go wrong
- Use
print()statements to understand what’s happening
Why This Matters: These might seem like simple tools, but they’re the foundation everything else builds on. Every advanced data science technique - machine learning, statistical analysis, data visualization - starts with these basic skills.
Professional Reality Check: Real data scientists spend 80% of their time doing exactly these things: organizing files, reading data, cleaning it up, and generating clear reports. The fancy algorithms are just 20% of the work!
Next week: We’ll learn how to save and share our work with Git and GitHub!