02: Python + Git
VS Code Basics (GUI-first)
Section titled “VS Code Basics (GUI-first)”We’ll start in the editor so Git makes visual sense later. No JSON needed—just the VS Code interface.
Palette Cleanse: Command Palette & Quick Open
Section titled “Palette Cleanse: Command Palette & Quick Open”- Open Command Palette: View → Command Palette… (Cmd+Shift+P)
- Quick Open files: (Cmd+P)
- Search across files: View → Search (Cmd+Shift+F)
Themes and Schemes: Make it Py‑pretty
Section titled “Themes and Schemes: Make it Py‑pretty”- Change Color Theme: Code → Settings → Theme → Color Theme (or Cmd+K, Cmd+T). I am a fan of:
- “Tomorrow Night Bright”
- “GitHub Dark High Contrast”
- Toggle icons: Code → Settings → Theme → File Icon Theme
Meet the Main Bars
Section titled “Meet the Main Bars”- Activity Bar (left): Explorer, Search, Source Control, Run & Debug, Extensions
- Side Bar: Toggle via View → Appearance → Show Side Bar
- Panel (bottom): Problems, Output, Debug Console, Terminal (toggle: View → Appearance → Panel Position)
- Secondary Side Bar (right): View → Appearance → Show Secondary Side Bar
- Breadcrumbs: View → Appearance → Show Breadcrumbs
- Zen Mode: View → Appearance → Zen Mode (Esc Esc to exit)
Core Panes You’ll Use
Section titled “Core Panes You’ll Use”- Explorer: View → Explorer (Cmd+Shift+E)
- Source Control: View → Source Control (Cmd+Shift+G)
- Run & Debug: Run → Start Debugging (F5) or View → Run (Ctrl+Shift+D)
- Extensions: View → Extensions (Cmd+Shift+X)
- Terminal: View → Terminal (Ctrl+`)
- Split Editor: View → Editor Layout → Split Right (or Cmd+)
Settings (GUI) you’ll toggle today
Section titled “Settings (GUI) you’ll toggle today”- Format on Save: Code → Settings → Settings → Search “Format on Save” → check
- Python Interpreter: Click bottom‑right “Python” status or Cmd+Shift+P → “Python: Select Interpreter”
- Default Formatter (optional): Settings → Search “Default Formatter” → choose “Black” or “Ruff” if installed
- Markdown Preview: Right‑click a .md → “Open Preview to the Side” (Cmd+K V)
Recommended Extensions (install via View → Extensions)
Section titled “Recommended Extensions (install via View → Extensions)”- Python
- Pylance (can help with debugging later, I prefer ruff)
- Jupyter (we’ll use this a lot later)
- Markdown All in One
- markdownlint
- Markdown Checkboxes
- GitHub Markdown Preview
- Bonus mentions: Error Lens, YAML, indent‑rainbow, GitLens
Break(points) the Ice: 5‑minute hands‑on
Section titled “Break(points) the Ice: 5‑minute hands‑on”- Change the Color Theme (Preferences: Color Theme)
- Install “Python” and “Markdown All in One”
- Turn on “Format on Save” in Settings (GUI)
- Open a
.pyfile → add a breakpoint (click gutter) → Run → Start Debugging - Open a
.mdfile → right‑click → Open Preview to the Side - Make a small edit → View → Source Control → stage, commit (GUI)
Git Version Control
Section titled “Git Version Control”
Don’t worry - we’re taking a different approach than that xkcd suggests!
Why Version Control Matters
Section titled “Why Version Control Matters”The Problem Without Version Control
Section titled “The Problem Without Version Control”Picture this: You’re working on a data analysis. You create these files:
analysis_v1.pyanalysis_v2.pyanalysis_v2_final.pyanalysis_v2_final_ACTUALLY_FINAL.pyanalysis_fixed_broken_computer_recovery.py
Sound familiar? Now imagine collaborating with teammates doing the same thing. Chaos!
The Git Solution
Section titled “The Git Solution”Git tracks every change, letting you see what changed, restore versions, work in parallel, collaborate, and avoid losing work. Infinite undo plus collaboration.
Git Concepts - The Mental Model
Section titled “Git Concepts - The Mental Model”Repository (Repo)
Section titled “Repository (Repo)”Your project folder that Git tracks. Contains your files plus a hidden .git folder with all the version history.
Think: “This entire folder is under Git management.”
Commit
Section titled “Commit”A saved snapshot of your project at a specific point in time. Like saving a game - you can always come back to this exact state.
Think: “I’m saving my progress with a description of what I accomplished.”
Remote
Section titled “Remote”The version of your repository stored on GitHub (or similar service). Your local computer has a copy, GitHub has a copy, your teammates have copies.
Think: “The shared version everyone can access.”
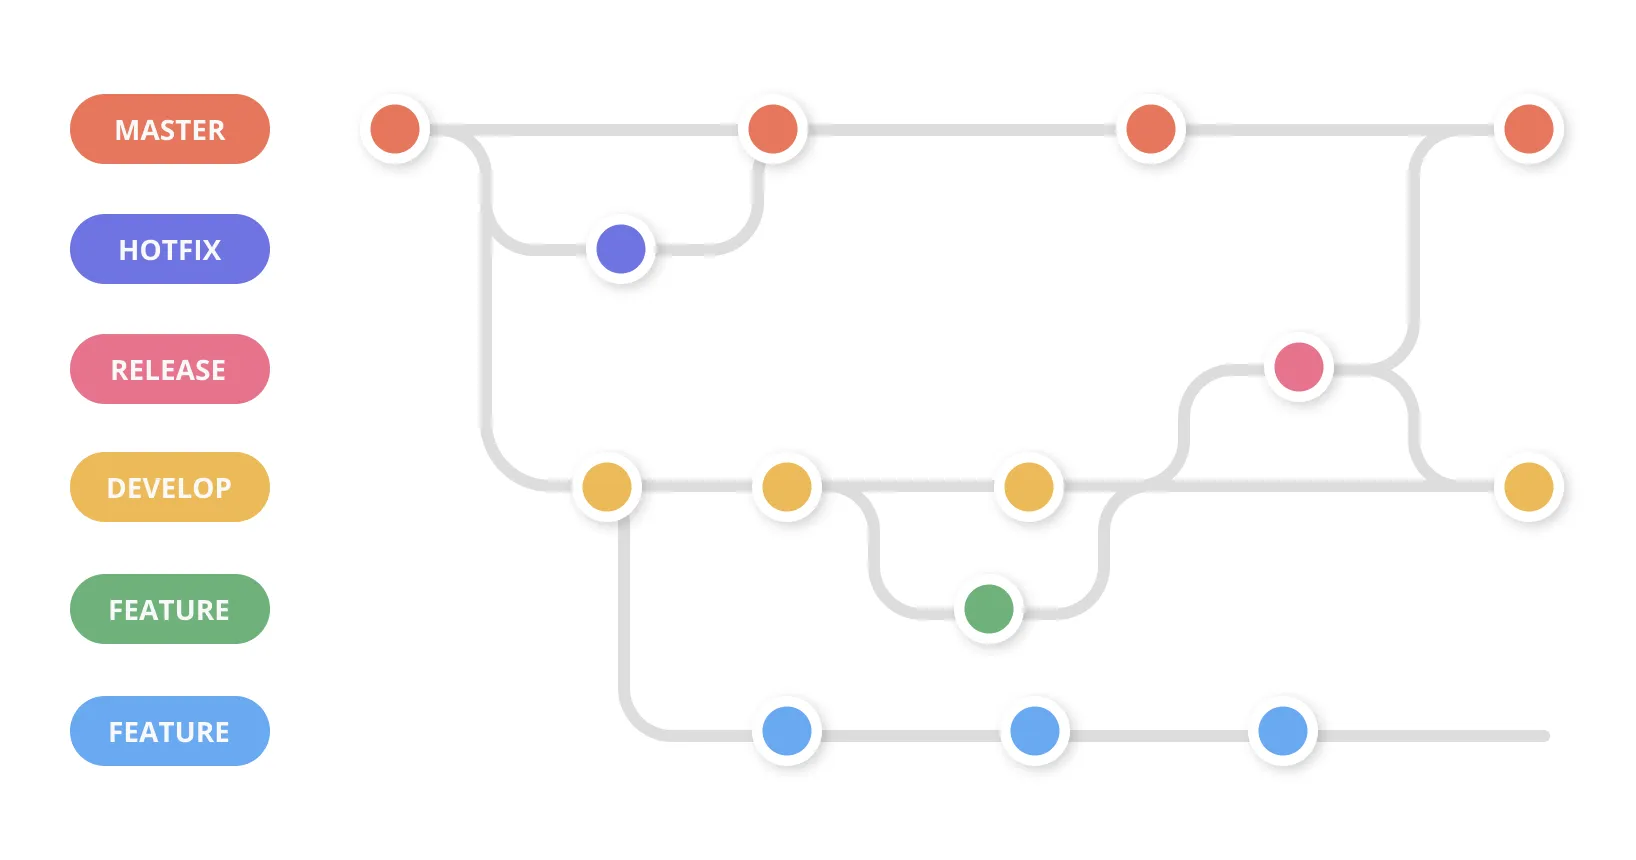
Branch
Section titled “Branch”A parallel timeline for your project. The main branch contains your official version, feature branches contain experimental work.
Think: “I’m trying something new without risking the working version.”
We’ll focus on the main branch today - branches come later!
Reference:
- Repository: Collection of objects and references
- Commit: Snapshot with metadata (author, message, parents)
- Blob: File content
- Tree: Directory structure
- Reference: Human-readable name pointing to commit
- HEAD: Current commit reference
- Branch: Movable reference to commit
- Remote: Reference to repository on another machine
Essential Git Commands
Section titled “Essential Git Commands”Basic Git commands let you control what changes are committed using a three-stage workflow: working directory, staging area, repository.
Reference:
Essential:
git init- Initialize repositorygit clone [url]- Copy remote repositorygit status- Show working directory statusgit add [file]- Stage changesgit commit -m "message"- Create commitgit push [remote] [branch]- Send commits to remotegit pull [remote] [branch]- Fetch and merge from remote
Helpful but less essential:
git remote add [name] [url]- Add remotegit fetch [remote]- Download commits without merginggit remote -v- List remotesgit log- Show commit historygit diff- Show changesgit checkout [commit/branch]- Switch to commit or branchgit branch [name]- Create branchgit merge [branch]- Merge branch
Brief Example:
# Local repository workflowgit init                      # Start new repositorygit add analysis.py           # Stage filegit commit -m "Add analysis script"  # Create commitgit branch feature-analysis  # Create branchgit checkout feature-analysis # Switch to branch
# Remote repository workflowgit clone https://github.com/user/repo.git  # Clone existing repogit push origin main          # Push changesgit pull origin main          # Pull updates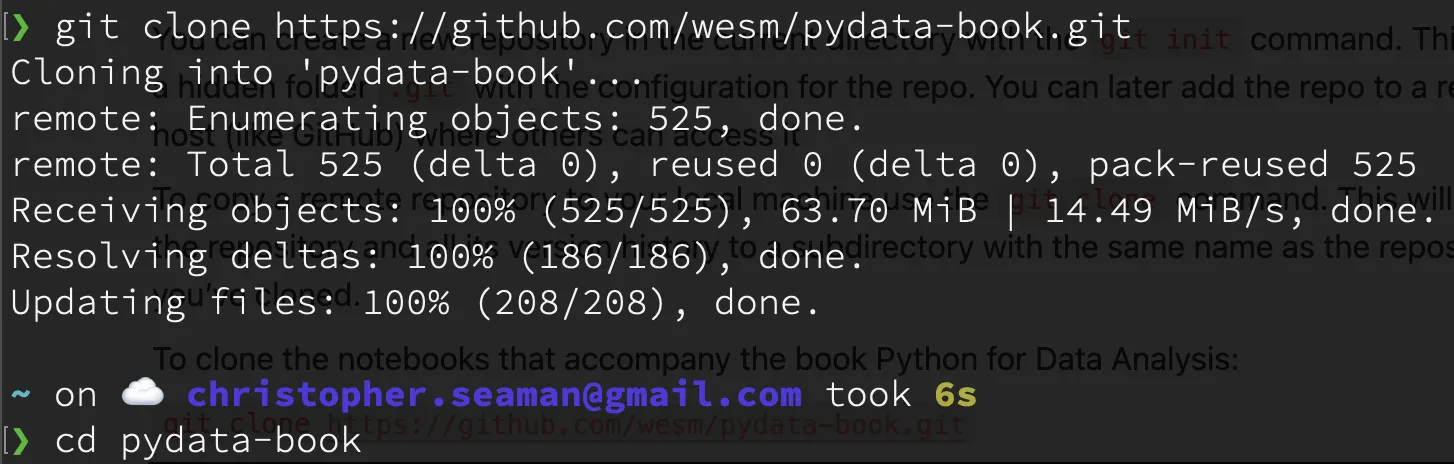
Good vs. Bad Commit Messages
# Good commit messagegit commit -m "Add data validation to analysis script
- Validate input file exists before processing- Check data format matches expected schema- Add error handling for malformed data
Fixes issue #123"
# Bad commit messagegit commit -m "minor changes"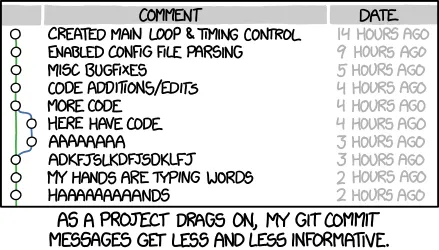
VS Code Git Integration
Section titled “VS Code Git Integration”Setting Up Git in VS Code
Section titled “Setting Up Git in VS Code”Reference:
- Install VS Code (if not already done)
- Open VS Code → View → Source Control (or Ctrl+Shift+G)
- If first time: VS Code will prompt to configure Git username/email
VS Code’s Source Control panel makes version control accessible without memorizing command-line syntax. This integration streamlines daily staging, committing, and managing changes.
Reference:
- Source Control Panel:
Ctrl+Shift+G(Windows/Linux) orCmd+Shift+G(Mac) - Stage Changes: Click
+next to files in “Changes” section - Commit: Type message in text box, press
Ctrl+Enter(Windows/Linux) orCmd+Enter(Mac) - View Differences: Click on modified files to see changes
- Branch Management: Click branch name in status bar to switch/create branches
- Push/Pull: Use sync button or command palette (
Ctrl+Shift+P)
VS Code Git Workflow:
1. Edit files (e.g., analysis.py)2. Ctrl+Shift+G → Open Source Control panel3. Click + next to changed files to stage4. Type commit message: "Add data validation to analysis script"5. Ctrl+Enter to commit6. Click sync button to push to GitHubGit Workflow: Branching and Merging
Section titled “Git Workflow: Branching and Merging”Git branching develops features in isolation before merging to main, enabling parallel development and safe experimentation.
Reference:
git branch [name]- Create new branchgit checkout [branch]- Switch to branchgit checkout -b [name]- Create and switch to new branchgit merge [branch]- Merge branch into current branchgit branch -d [name]- Delete branchgit push origin [branch]- Push branch to remote
Branching Workflow:
# Create feature branchgit checkout -b feature/data-analysis# Make changes, commitgit add .git commit -m "Add data analysis functionality"git push origin feature/data-analysis
# Switch back to main and mergegit checkout maingit merge feature/data-analysisgit push origin main
# Clean up feature branchgit branch -d feature/data-analysis
Merge Conflict Resolution: When Git cannot automatically merge changes, it creates merge conflicts that must be resolved manually:
- Open conflicted files in VS Code
- Choose which changes to keep
- Remove conflict markers (
<<<<<<<,=======,>>>>>>>) - Stage resolved files:
git add [file] - Complete merge:
git commit
GitHub Web Interface
Section titled “GitHub Web Interface”GitHub’s web interface manages repositories, enables collaboration, and organizes projects.
Reference:
- Repository Creation: “New repository” button, choose name and settings
- File Management: “Add file” → “Create new file” or “Upload files”
- Commit via Web: Edit files directly, add commit message, commit
- Pull Requests: “Pull requests” tab → “New pull request”
- Issues: “Issues” tab → “New issue” for bug reports and feature requests
- Project Settings: Settings tab for permissions, branches, and integrations
- Code Review: Comment on specific lines, approve/request changes
Gitignore Files:
A .gitignore file specifies which files and directories Git should ignore when tracking changes. This is crucial for data science projects to avoid committing sensitive data, large datasets, or generated files.
Reference:
.gitignorepatterns use glob patterns#for comments*matches any characters?matches single character[abc]matches any character in brackets!negates pattern**/matches directories recursively
Brief Example:
# Python cache files__pycache__/*.pyc
# Data and secretsdata/raw/*.csv.env*.key
# IDE files.vscode/.idea/
# Track important files!data/processed/important_results.csv
This prevents accidentally committing sensitive information, large files, or generated content while preserving important project files.
Brief Example:
Create repository: github.com → ”+” → “New repository” → Name, description, add README → Create.
Add files: “Add file” → “Create new file” → Name, add code, commit message → Commit.
Markdown Documentation
Section titled “Markdown Documentation”Markdown is a lightweight markup language for formatted text, essential for documentation and project communication. Files are human-readable and render beautifully on GitHub.
Reference:
- Headers:
# H1,## H2,### H3 - Bold:
**bold text** - Italic:
*italic text* - Code:
`inline code` - Code blocks: ```language
- Lists:
- itemor1. item - Links:
[text](url) - Images:
 - Tables:
| col1 | col2 |
Brief Example:
# Data Analysis Report
## OverviewAnalyzes study time vs. performance.
## Key Findings- More hours → higher grades- Regular habits help
## Code Example```pythonimport pandas as pddf = pd.read_csv('study_data.csv')print(f"Correlation: {df['hours'].corr(df['grade']):.2f}")# Python Fundamentals (McKinney Ch2+3)
Python emphasizes readability for data analysis. Everything is an object, enabling consistent behavior. Focus is on practical data manipulation.

## Language Semantics and Object Model
Python uses indentation for code structure, creating clean code. Every value is an object with type information, enabling dynamic behavior.
**Reference:**- Indentation defines code blocks (4 spaces recommended)- `#` for comments- `type(object)` - Get object type- `isinstance(object, type)` - Type checking- `id(object)` - Get object identity- `dir(object)` - List object attributes
**Brief Example:**```python# Indentation mattersif x > 0: print("Positive") y = x * 2
print(type(42)) # <class 'int'>print(isinstance("hello", str)) # TrueObject Introspection and Dynamic Type Checking
Section titled “Object Introspection and Dynamic Type Checking”Object introspection examines objects at runtime—their type, attributes, and methods. Valuable for unknown datasets and flexible code.
Python uses duck typing: “If it walks like a duck and quacks like a duck, then it must be a duck.” If an object supports the needed methods, you can use it—regardless of its actual type.

This means functions work with any object that behaves as expected, not just those of a specific type.
Reference:
type(object)- Returns the object’s typedir(object)- Lists attributes and methodshelp(object)- Shows documentation
# Duck typing: treat the same object as different typesbig_number = 12345print(f"As a number: {big_number} (type: {type(big_number).__name__})")
# Convert to string - now we can iterate through digitsnumber_as_string = str(big_number)print(f"As a string: '{number_as_string}' (type: {type(number_as_string).__name__})")
# Duck typing: if it acts like an iterable, treat it like onedigit_sum = 0for digit_char in number_as_string:  # Treating string like a list    digit_sum += int(digit_char)     # Converting back to int
print(f"Sum of digits: {digit_sum}")
Scalar Types and Operations
Section titled “Scalar Types and Operations”Scalar types represent single values. Python provides rich support for numeric operations, string manipulation, and boolean logic.
Reference:
int- Arbitrary precision integersfloat- Double-precision floating-pointstr- Unicode stringsbool- True/False valuesNone- Null value- Arithmetic:
+,-,*,/,//,%,** - Comparison:
==,!=,<,>,<=,>= - Logical:
and,or,not
Brief Example:
# Numeric operationscount = 150average = 87.3population = 1.4e9  # Scientific notation
# String operationsname = "Alice Johnson"clean_name = "  Bob Smith  ".strip()
# Boolean logichas_data = Trueanalysis_ready = has_data and count > 0
String Operations for Data Cleaning
Section titled “String Operations for Data Cleaning”String operations are fundamental for data cleaning. Python provides built-in methods for transforming, cleaning, and validating text data.
Reference:
str.strip()- Remove leading/trailing whitespacestr.lower(),str.upper()- Case conversionstr.split(separator)- Split into liststr.replace(old, new)- Replace substringsstr.startswith(),str.endswith()- Check prefixes/suffixesstr.find(),str.index()- Find substring positionsstr.isdigit(),str.isalpha(),str.isalnum()- Type validation
Brief Example:
# Data cleaning operationsmessy_data = "  Alice Johnson  "clean_name = messy_data.strip().title()
# Text processingfilename = "data_2023_report.csv"if filename.endswith(".csv"):    print("Processing CSV file")
# Data validationuser_input = "123abc"if user_input.isalnum():    print("Input contains only letters and numbers")
Print Statements and Output Formatting
Section titled “Print Statements and Output Formatting”Print statements communicate results and debug code. Understanding formatting options enables clear output.
Reference:
print(value)- Basic printingprint(value1, value2, value3)- Multiple valuesf"text {variable}"- F-string formatting (preferred)"text {}".format(variable)- Format methodprint(f"Debug: {var} = {value}")- Debugging outputprint(f"Result: {result:.2f}")- Number formatting
Brief Example:
# Basic printingprint("Analysis complete")print("Value:", 42)
# F-string formatting (preferred)name = "Alice"score = 87.3456print(f"Student: {name}")print(f"Score: {score:.1f}%")
# Debugging with printdata = [1, 2, 3, 4, 5]print(f"Debug: data = {data}, length = {len(data)}")
Basic File I/O Operations
Section titled “Basic File I/O Operations”File I/O operations are essential for data science. Python provides simple tools for reading and writing files.
Reference:
open(file, mode)- Open file with specified mode'r'- Read mode (default)'w'- Write mode (overwrites existing files)'a'- Append mode (adds to existing files)'x'- Create mode (fails if file exists)file.read()- Read entire file contentfile.readline()- Read single linefile.readlines()- Read all lines into listfile.write(string)- Write string to filefile.close()- Close file handle
Brief Example:
# Reading from a filewith open('data.txt', 'r') as file:    content = file.read()    print(f"File content: {content}")
# Writing to a fileresults = ["Alice: 95", "Bob: 87", "Charlie: 92"]with open('grades.txt', 'w') as file:    for result in results:        file.write(f"{result}\n")
# Appending to a filewith open('log.txt', 'a') as file:    file.write("2023-12-01: Analysis completed\n")
# Print to file exampleswith open('results.txt', 'w') as file:    print("Analysis Results", file=file)    print(f"Average score: {score:.1f}", file=file)
# One-liner file outputprint("Debug info", file=open('debug.log', 'a'))
# Multiple outputs to same filewith open('report.txt', 'w') as report:    print("Data Science Report", file=report)    print("=" * 20, file=report)    print(f"Total samples: {len(data)}", file=report)
Control Flow Structures
Section titled “Control Flow Structures”Control flow determines execution order through conditionals and loops. Python’s syntax emphasizes readability and iteration.
Reference:
if condition: ... elif condition: ... else: ...for variable in iterable: ...while condition: ...break- Exit loopcontinue- Skip to next iterationrange(start, stop, step)- Generate number sequences
Brief Example:
# Conditional logicscore = 85if score >= 90:    grade = "A"elif score >= 80:    grade = "B"else:    grade = "C"
# Iterationfor i in range(5):    print(f"Count: {i}")
# List iterationgrades = [85, 92, 78, 96]for grade in grades:    if grade >= 90:        print(f"Excellent: {grade}")
Data Structures: Lists and Tuples
Section titled “Data Structures: Lists and Tuples”Lists provide mutable sequences for data. Tuples offer immutable sequences useful for fixed records.
Reference:
list()- Create list[item1, item2, ...]- List literallist.append(item)- Add to endlist.insert(index, item)- Insert at positionlist.remove(item)- Remove first occurrencelist.pop(index)- Remove and return itemtuple()- Create tuple(item1, item2, ...)- Tuple literal
Brief Example:
# Lists - mutable sequencesgrades = [85, 92, 78, 96, 88]grades.append(90)grades.insert(1, 87)total = sum(grades)
# Tuples - immutable sequencescoordinates = (40.7128, -74.0060)name, age, gpa = ("Alice", 22, 3.8)  # Unpacking
Data Structures: Dictionaries and Sets
Section titled “Data Structures: Dictionaries and Sets”Dictionaries provide key-value storage for structured data. Sets offer unique collections with mathematical operations.
Reference:
dict()- Create dictionary{key: value, ...}- Dictionary literaldict[key]- Access valuedict.get(key, default)- Safe accessdict.keys(),dict.values(),dict.items()- Iterationset()- Create set{item1, item2, ...}- Set literalset.union(),set.intersection(),set.difference()- Set operations
Brief Example:
# Dictionaries - key-value storagestudent = {"name": "Alice", "grade": 85, "major": "Data Science"}print(student["name"])  # "Alice"print(student.get("gpa", 0.0))  # Safe access
# Sets - unique collectionsmath_students = {"Alice", "Bob", "Charlie"}cs_students = {"Alice", "Diana", "Eve"}both_subjects = math_students & cs_students  # Intersection
List Comprehensions and Sequence Functions
Section titled “List Comprehensions and Sequence Functions”List comprehensions provide concise syntax for creating lists through transformation and filtering. Sequence functions offer efficient operations.
Reference:
[expr for item in iterable if condition]- List comprehensionenumerate(iterable)- Get index and value pairszip(iterable1, iterable2)- Combine sequencessorted(iterable)- Create sorted listreversed(iterable)- Reverse sequencesum(),min(),max(),len()- Aggregation functions
Brief Example:
# List comprehensionsgrades = [85, 92, 78, 96, 88]passing_grades = [g for g in grades if g >= 80]
# Sequence functionsfor index, grade in enumerate(grades):    print(f"Student {index + 1}: {grade}")
names = ["Alice", "Bob", "Charlie"]scores = [85, 92, 78]for name, score in zip(names, scores):    print(f"{name}: {score}")
Functions
Section titled “Functions”Functions organize code into reusable units with clear interfaces. They enable reuse, testing, and modular design.
Reference:
def function_name(parameters): ...- Function definitionreturn value- Return value- Function calls:
result = function_name(arguments) - Default parameters:
def func(param=default_value):
Brief Example:
# Function definitiondef calculate_average(grades):    """Calculate the average of a list of grades."""    if not grades:        return 0    return sum(grades) / len(grades)
### Function usagegrades = [85, 92, 78, 96, 88]average = calculate_average(grades)print(f"Average grade: {average:.1f}")
__main__ for script execution
Section titled “__main__ for script execution”if name == “main”: # This code runs when script is executed directly grades = [85, 92, 78, 96, 88] average = calculate_average(grades) print(f”Average grade: {average:.1f}“)
Command Line Mastery (review)
Section titled “Command Line Mastery (review)”Essential Navigation Commands
Section titled “Essential Navigation Commands”Navigation commands orient you within the file system.
Reference:
pwd- Print working directory (shows current location)ls- List directory contentsls -la- List with detailed information (permissions, size, date)cd [path]- Change directorycd ..- Move up one directory levelcd ~- Navigate to home directorycd -- Return to previous directory
Brief Example:
pwd # /Users/username/Documentsls -la # Show all files with detailscd projects/data_sciencepwd # /Users/username/Documents/projects/data_scienceFile and Directory Operations
Section titled “File and Directory Operations”File operations create and organize project structures.
Reference:
mkdir [name]- Create directorymkdir -p [path/to/nested]- Create nested directoriestouch [filename]- Create empty filecp [source] [destination]- Copy files or directoriesmv [source] [destination]- Move or rename filesrm [filename]- Remove filerm -r [directory]- Remove directory recursivelyrm -rf [directory]- Force remove directory (use with caution)
Brief Example:
mkdir -p data/raw data/processed scriptstouch scripts/analysis.pycp data/raw/dataset.csv data/processed/Text Processing and Search
Section titled “Text Processing and Search”Text processing commands explore and manipulate text data.
Reference:
cat [filename]- Display entire filehead [filename]- Show first 10 linestail [filename]- Show last 10 linesgrep [pattern] [filename]- Search for text patternsgrep -r [pattern] [directory]- Recursive searchwc -l [filename]- Count lines in file
Brief Example:
head -20 data.csv # Preview first 20 linesgrep "error" logfile.txt # Find error messagesVisual Directory Structure
Section titled “Visual Directory Structure”The tree command shows directory structure hierarchically.
Reference:
tree- Show directory structuretree -L 2- Limit depth to 2 levelstree -a- Show hidden filestree -d- Show directories only
Brief Example:
tree # Show full directory structuretree -L 2 # Show only 2 levels deeptree -d # Show only directoriesHistory Navigation and Shortcuts
Section titled “History Navigation and Shortcuts”Shortcuts and history navigation improve command line efficiency.
Reference:
Up arrow- Previous commandDown arrow- Next commandCtrl+A- Move to beginning of lineCtrl+E- Move to end of lineCtrl+K- Delete from cursor to end of lineCtrl+U- Delete from cursor to beginning of lineTab- Auto-complete commands, files, directoriesCtrl+R- Reverse search through historyCtrl+C- Cancel current commandCtrl+D- Exit shell
Brief Example:
# Use up arrow to recall previous commands# Use Tab to complete: cd pro<Tab> → cd projects/# Use Ctrl+R to search: Ctrl+R then type "git" to find git commandsShell Scripting Fundamentals
Section titled “Shell Scripting Fundamentals”Shell scripting automates tasks and creates reusable command sequences.
Reference:
#!/bin/bash- Shebang line for bash scriptsecho "text"- Print text to terminalmkdir -p dirname- Create directory (and parents if needed)chmod +x script.sh- Make script executable$1, $2, $3...- Command line arguments$@- All arguments$#- Number of arguments$?- Exit code of last command
Brief Example:
#!/bin/bash# Create project structureecho "Setting up project..."mkdir -p src data outputecho "Directories created"
# Make script executablechmod +x setup.sh
# Create files using here-documentscat > data/sample.csv << 'EOF'name,age,gradeAlice,20,85Bob,19,92EOF
echo "Setup complete!"
Command Chaining and Redirection
Section titled “Command Chaining and Redirection”Command chaining creates data processing pipelines. Redirection controls input and output.
Reference:
command1 | command2- Pipe output to next commandcommand1 && command2- Run command2 only if command1 succeedscommand1 || command2- Run command2 only if command1 failscommand > file- Redirect output to filecommand >> file- Append output to filecommand < file- Use file as input
Brief Example:
grep "error" logfile.txt | wc -l # Count error linesls *.csv | head -5 > filelist.txt # Save first 5 CSV files to list